 OpenTofu Foundations - A FREE Weekly Workshop to Build your IaC Skills - LIMITED AVAILABILITY
 GitHub Action
This guide will walk you through the process of setting up a GitHub Action to build, push, and deploy app changes to your chosen cloud container repository.
Before getting started, you'll need:
- A Massdriver account
- A Massdriver service account
- A GitHub repository with your application code
Applications
Publish your application
Before you can set up a GitHub Action to deploy your application, first you'll need to publish it to Massdriver and create a package. You can do this by following the Create App guide.
After you publish your application, you'll need to create a package. You can do this by dragging your application out from the bundle bar in the Massdriver canvas. Fill in the fields of your application and click Save.
Set secrets and vars
Once you've published your application, you'll need to set the following secrets and vars in your GitHub repository:
| Name | Description | Type | Notes |
|---|---|---|---|
MASSDRIVER_ORG_ID | Your Massdriver organization ID | secret | Copy your Organization ID |
MASSDRIVER_API_KEY | Your Massdriver API key | secret | Create a Service Account |
MASSDRIVER_ARTIFACT_ID | The ID of the authentication artifact in Massdriver | secret | Copy your Artifact ID |
NAMESPACE | The namespace of your build | variable | If it does not exist paired with the IMAGE_NAME, then it will be created for you |
IMAGE_NAME | The image name of your build | variable | If it does not exist paired with the NAMESPACE, then it will be created for you |
REGION | The region where your cloud container repository is located | variable | Must be a valid cloud region. For example: eastus for Azure, or us-west-1 for AWS. |
Workflow file
To set up the GitHub Action, create a new file named deploy.yaml in the .github/workflows directory of your GitHub repository. You can use this workflow below as a starting point:
name: Deploy to Massdriver
on:
  push:
    branches: [main]

jobs:
  push_and_deploy:
    runs-on: ubuntu-latest
    env:
      MASSDRIVER_ORG_ID: ${{ secrets.MASSDRIVER_ORG_ID }}
      MASSDRIVER_API_KEY: ${{ secrets.MASSDRIVER_API_KEY }}
    steps:
      - uses: actions/checkout@v4
      - name: Install Massdriver CLI
        uses: massdriver-cloud/actions@v4
      - name: Push Image
        uses: massdriver-cloud/actions/image_push@v4
        with:
          namespace: ${{ vars.NAMESPACE }}
          image-name: ${{ vars.IMAGE_NAME }}
          artifact: ${{ secrets.MASSDRIVER_ARTIFACT_ID }}
          region: ${{ vars.REGION }}
          image-tag: ${{ github.sha }}
          build-context: ./ # path to Dockerfile
      - name: Publish Bundle
        uses: massdriver-cloud/actions/bundle_publish@v4
        with:
          build-directory: ./massdriver # path to massdriver config directory, contains massdriver.yaml
      - name: Set Image Version
        uses: massdriver-cloud/actions/app_patch@v4
        with:
          project: <insert-project-abbreviation-here>
          env: <insert-environment-abbreviation-here>
          manifest: <insert-manifest-abbreviation-here>
          set: |
            <insert-image-tag-path> = "${{ github.sha }}"
      - name: Deploy App
        uses: massdriver-cloud/actions/app_deploy@v4
        with:
          project: <insert-project-abbreviation-here>
          env: <insert-environment-abbreviation-here>
          manifest: <insert-manifest-abbreviation-here>
This example is configured to trigger on pushes to the repository's main branch. Be sure to update the trigger to match your branching and git workflow process.
When this GitHub Action runs, it will:
- Build and push your image to your cloud container repository
- Update the tag in your application package
- Redeploy your application in Massdriver with the updated tag
Infrastructure
Publish your bundle
Before you can set up a GitHub Action to automate publishing your bundle, first you'll need to manually publish it to Massdriver and create a package. You can do this by following the Bundle Creation Walkthrough guide.
After you publish your bundle, you'll need to create a package. You can do this by dragging your bundle out from the bundle bar in the Massdriver canvas. Fill in the fields of your bundle and click Save.
Set secrets
| Name | Description | Type | Notes |
|---|---|---|---|
MASSDRIVER_ORG_ID | Your Massdriver organization ID | secret | Copy your Organization ID |
MASSDRIVER_API_KEY | Your Massdriver API key | secret | Create a Service Account |
Workflow file
To set up the GitHub Action, create a new file named publish.yaml in the .github/workflows directory of your GitHub repository. You can use this workflow below as a starting point:
name: Publish to Massdriver
on:
  push:
    branches: [main]

jobs:
  publish:
    runs-on: ubuntu-latest
    env:
      MASSDRIVER_ORG_ID: ${{ secrets.MASSDRIVER_ORG_ID }}
      MASSDRIVER_API_KEY: ${{ secrets.MASSDRIVER_API_KEY }}
    steps:
      - uses: actions/checkout@v4
      - name: Install Massdriver CLI
        uses: massdriver-cloud/actions@v4
      - name: Publish Bundle
        uses: massdriver-cloud/actions/bundle_publish@v4
        with:
          build-directory: ./ # path to massdriver config directory, contains massdriver.yaml
This example is configured to trigger on pushes to the repository's main branch. Be sure to update the trigger to match your branching and git workflow process.
FAQs
Where can I find my secrets, project, environment, and manifest names?
- Secrets & vars
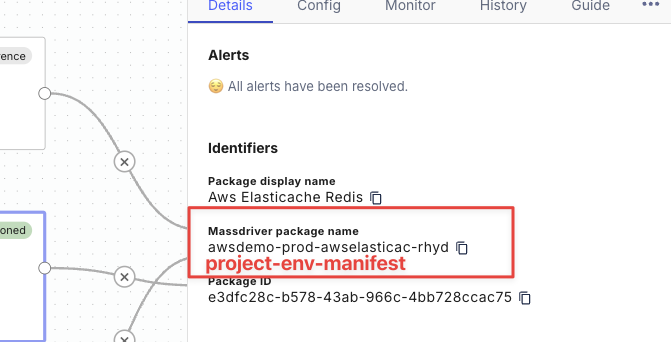
Project,environment, andmanifestnames are found in theMassdriver package name:
Where can I find my image tag path?
The image tag path is the jq formatted path to the image tag field in the params section of your application's massdriver.yaml file. For example, if your massdriver.yaml file looks like this:
runtime:
  type: object
  title: Runtime Settings
  required:
    - image
  properties:
    image:
      type: object
      title: Container Image
      required:
        - tag
      properties:
        tag:
          title: ECR image tag
          description: Specific version of the container to pull on each deployment of the lambda function.
          type: string
          default: latest
Then your image tag path would be .runtime.image.tag.
I have subdirectories in my repository. How do I set the build context?
- If your
Dockerfileis in a subdirectory, you can update thebuild-contextto point to that directory. For example, if yourDockerfileis in the./appdirectory, you can set thebuild-contextto./app. - If your
massdriver.yamlfile is in a subdirectory, you can update thebuild-directoryto point to that directory. For example, if yourmassdriver.yamlfile is in the./app/massdriverdirectory, you can set thebuild-directoryto./app/massdriver.
View the Massdriver GitHub Actions on the GitHub Marketplace.